

Update note: This post is based on the Codex App as of May 2026. SSH Remote is still in alpha, and the configuration methods and UI entry points may change with new releases. If anything here has gone stale, refer to the official documentation for the latest.
The Codex App now supports connecting to remote machines over SSH; the feature is currently in alpha.
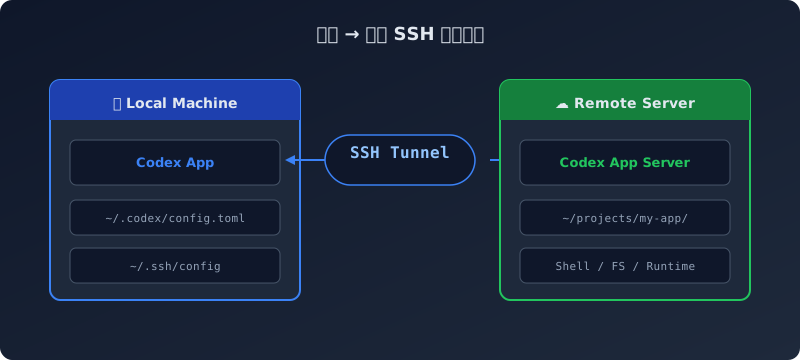
If you develop on remote servers, train models, or run environments there, this is worth a try. It lets you connect to a remote server directly inside Codex and work in the remote filesystem and shell — no more jumping back and forth between a local terminal, VSCode Remote, SSH, and tmux.
1. Who Is This For?#
Worth a close look if:
- You write code locally and run models on lab or company GPU servers
- Your backend project depends on a remote deployment environment (code, dependencies, databases, and services all live on a remote devbox)
- You spend your days in
ssh + tmux + vimor VSCode Remote-SSH - You need to switch development environments across multiple machines
This kind of workflow used to look like:
| |
Now Codex is bringing the “remote development environment” in as a first-class citizen.
2. Enabling the SSH Remote Feature#
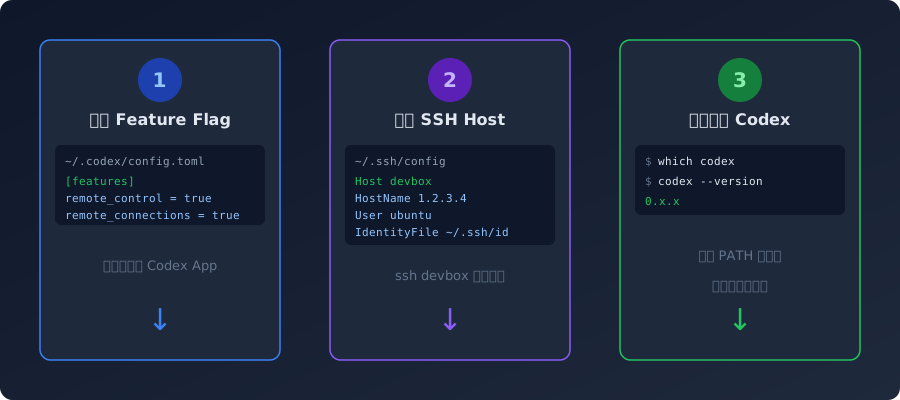
The feature is still in alpha, so you need to flip the feature flag manually.
Edit the local Codex config at ~/.codex/config.toml and add:
| |
Save, then restart the Codex App.
3. Configuring the SSH Host#
The official recommendation is to add the remote machine to your local SSH config first, so Codex can auto-discover the configured SSH host.
Edit ~/.ssh/config:
| |
Once configured, verify connectivity from a local terminal first:
| |
If this fails, Codex will almost certainly fail too. Check first:
- Is the network reachable (test the port with
pingortelnet) - Is the key correct (see verbose logs with
ssh -v devbox) - Do the username and port match
4. Preparing the Remote Machine#
When the Codex App connects to a remote project, it starts a Codex app server on the remote machine over SSH. So the remote machine needs to satisfy these conditions:
- Codex installed — the remote side needs the Codex CLI too
- Authenticated — the remote side must be logged in and authorized
- On PATH — the
codexcommand must be reachable in the remote login shell’s PATH
SSH into the remote machine and check:
| |
If which codex prints nothing, the remote shell can’t find Codex. Common causes and fixes:
| Problem | Fix |
|---|---|
| Codex not installed | Install it per the official installation docs |
| Installed but not on PATH | Check that ~/.bashrc / ~/.zshrc / ~/.profile adds it to PATH correctly; note that an SSH non-interactive shell may not load all config files |
| Permission issues | Confirm the Codex binary is executable (chmod +x) |
~/.bash_profile or ~/.profile, and not ~/.bashrc. If your PATH setup lives in ~/.bashrc, you may need to add source ~/.bashrc to ~/.bash_profile, or put the PATH directly in ~/.profile.5. Adding a Remote Project in the Codex App#
After restarting the Codex App, follow these steps:
- Open the Codex App
- Go to Settings
- Find Connections
- Add or enable the configured SSH host
- Pick the project directory on the remote machine
- Create or open the remote project thread
Once configured, Codex’s file reads, file writes, and command runs all execute on the remote machine directly. It isn’t simply “viewing remote code” — it works fully inside the remote environment.
6. Troubleshooting#
Connection timeouts or failures#
| |
Remote Codex version mismatch#
The local Codex client and remote server versions need to match. If you hit a version-incompatibility error, try updating both ends to the latest version.
Unexpected behavior after connecting#
- Confirm the remote machine has enough disk space
- Confirm remote Codex has permission to access the target project directory
- Check the Codex App’s log output (usually under
~/.codex/logs/)
7. Compared with VSCode Remote-SSH#
| Aspect | VSCode Remote-SSH | Codex SSH Remote |
|---|---|---|
| Maturity | Stable, production-ready | Alpha |
| Editing model | Local UI + remote filesystem | AI agent executes directly on the remote |
| Best for | Manual code editing | AI-assisted coding, bulk operations |
| Extension support | Rich extension ecosystem | Features still being built |
For now, treat Codex SSH Remote as a companion tool that works alongside your existing development workflow, not a full replacement.
Wrap-up#
Codex SSH Remote is still in alpha, but for workflows that lean heavily on AI-assisted development in remote environments, it already saves real time. The core configuration steps boil down to:
- Enable the feature flag in local
~/.codex/config.toml - Configure the SSH host in
~/.ssh/config - Install Codex on the remote machine and make sure it’s on PATH
- Add the connection in the Codex App and pick the project directory
If anything goes wrong during setup, work through the troubleshooting steps above one by one.
